
Use this writing personal narratives unit of study to help you plan your writing workshop.

This is a free writing unit of study from The Curriculum Corner.
This personal narratives unit of study is meant to be used as a guide. You will find this can become your outline. You may add additional lessons to fit your class.
**Download the majority of the resources described below at the bottom of this post.
Using Mentor Texts
The lessons below are written in a way that will expose children to real published writing so that they have a model for writing their own personal narratives.
Teaching with mentor texts helps children to actually see the skills being taught and how real writers have chosen to use those ideas. Here is a snapshot of what that might look like:
- The teacher will read the mentor text (or a portion of the mentor text) and the class will spend time focusing on & learning a specific skill.
- Children are then expected to incorporate the skill into their own writing at some point.
- Conferencing with students is a key to your writing workshop. Teachers use this time to determine future mini-lessons. It also might simply be an opportunity for the teacher to talk one-on-one with a student about a previous lesson.
Preparing for the Unit
We believe that all writing units should start by creating a stack of personal narrative mentor texts. These are the examples you provide for the children as an illustration of good writing or specific aspects of writing. A useful stack should have between 10 and 20 personal narratives and should represent the range of skills that you wish to teach in the unit.
Children will become better writers if they can see how an author actually uses writing skills. You will find links to some of our favorite mentor texts at the bottom of this post (contains affiliate links.)

Lesson 1: Noticings
Once you have your stack of mentor texts for personal narratives, you are ready to let the children begin exploring. Introduce the unit topic to the class and explain the concept of a personal narrative. This first lesson is meant only for students to explore personal narratives to get a feel for what they truly are. They should be given the chance to look at books and make their own observations.
- Put the students in groups of 2 or 3 and hand them a couple of books from your stack.
- Give each group some Post-It notes and ask them to write what they “notice” about the books. If individual groups seem confused or stuck, sit with them and help them to find a few ideas to get them moving. If children need more time to explore, give them another day.
- When they are finished, come together as a group and share the noticings. As students share, discuss and add ideas to an anchor chart titled “Personal Narrative Noticings”.
Lesson 2: Identifying Personal Narratives
This second day of exploration is a little more guided than the first lesson.
- Partners should be given two books: a personal narrative book and one other type of book (nonfiction, fiction, fantasy, etc).
- Explain to students that their task is to figure out which book is the personal narrative and which book is not. Make sure they know that they will be asked to explain their reasoning for making a determination.
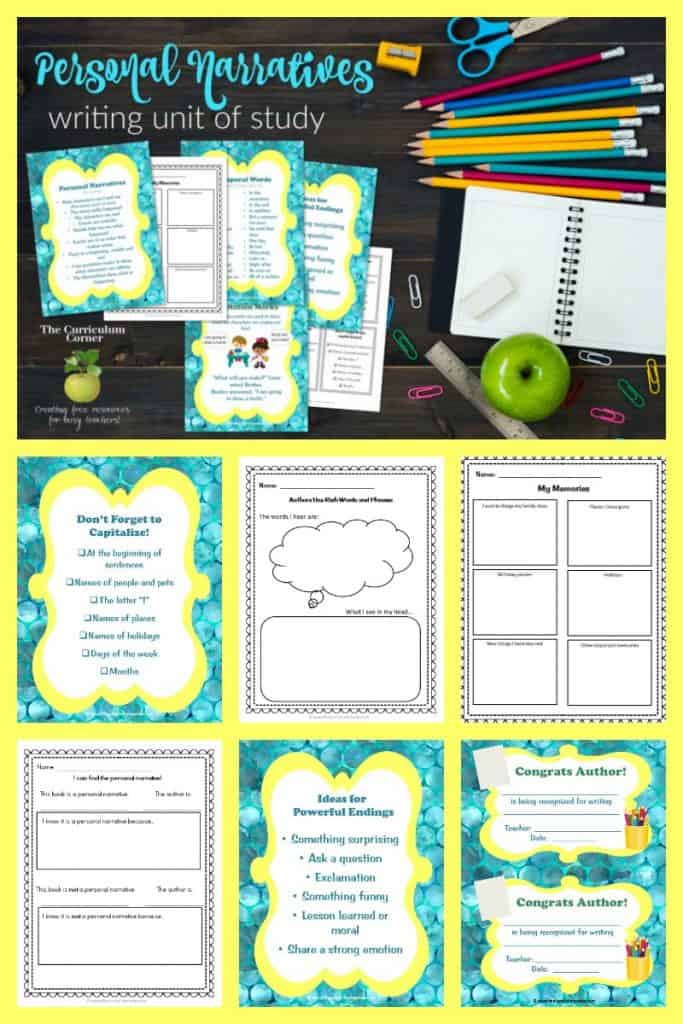
- Remind them to refer to the anchor chart you created from the first lesson. You might want to use our I Can Find the Personal Narrative recording sheet for students if you feel as if writing their thoughts will help them organize their thinking better.
Lesson 3: Choosing a Topic
Once you feel like your students understand the concept of a personal narrative, they are ready to begin trying to write their own. Choosing a topic can be daunting for students when it comes to writing stories about themselves, so we have created a brainstorming organizer to get them thinking of many possibilities.
- Show, model and talk about the My Memories organizer in front of the class while adding your own ideas for writing. Developing a list of possible topics at the beginning of a unit helps keep students engaged because it gives them more ideas once they have finished a story.
- Pass out the organizers and let students work on ideas of their own.
- When most are finished, allow them to meet with a partner to talk about their ideas. Encourage them to help partners who are struggling to fill in the boxes by asking questions about their lives.
Lesson 4: Stretching a Memory
Once students have a list of possible topics for their personal narratives, you will need to show them how to stretch a memory so that it can fill a book.
- Begin by reading Roller Coaster by Marla Frazee.
- When finished, ask students what the author wrote about. They will most likely answer this question in one sentence. Help them to understand that the sentence they shared is the topic, but that the author was able to write an entire book about that topic.
- Flip through the pages to guide them to look carefully how the author took one small event and broke it down into smaller events and used the details to stretch it into an entire book.
- Encourage children to think of one of their ideas from yesterday’s lesson that they could stretch into a book.
- We have created a Planning My Story organizer so that you can model for students how to choose a topic and make a plan for writing. Use your idea organizer, choose a topic and show children how to sketch (and stretch) a beginning, middle and end using the planning organizer. Then pass out the organizer and let students get started on their own.

Lesson 5: Writing a Personal Narrative Rough Draft
Once students have planned their stories, they are ready to begin writing.
- Your mini-lesson should be to simply model for the students how you use your planning organizer to write a rough draft.
- We believe younger students who write on paper made into actual blank books tend to write more and create stories that are more like real authors. We suggest that you use a blank book to model your rough draft.
- If you need blank books for students, you will find ours here: Blank Books and Papers for Student Writing
Lesson 6: Authors Use Rich Words and Phrases
For this lesson a good mentor text to use is Owl Moon by Jane Yolen. Another good one is Apple Picking Time by Michele Slawson.
- Before the lesson, choose a favorite passage from the book that illustrates rich language. Read it to the class without showing the picture.
- Have the children use the top part of Authors Use Rich Words & Phrases to jot down the interesting words they hear as you read.
- Have students share some of the words they wrote and then give them a few minutes to sketch a picture using the words they wrote at the top as inspiration.
- Next, read aloud the entire story and discuss how the author uses wonderful language to share the story better. Talk about how the words the author chose did a great job of helping readers to visualize what was happening.
- At this point you might want to go back to the passage you chose and point out the illustration that accompanies it. Students could share what they drew as well to see if there are any similarities.

Lesson 7: Authors Use Illustrations to Show Emotion
For this lesson we suggest Knuffle Bunny by Mo Willems as amentor text. This book has always been a favorite in our classrooms! Children love Trixie’s invented language and the author’s pictures, and this book is great for teaching children how authors use illustrations to show how a character is feeling.
- Throughout the book, the exaggerated pictures of Trixie help the reader to understand the little girl’s feelings. For some of the pages, cover the words before you read and have the students look at the pictures.
- Ask students to tell how they think Trixie is feeling on those specific pages and what clues made them think this. If you feel like students would enjoy a follow up to this lesson, repeat the activity with Knuffle Bunny Too.
Lesson 8: Authors Use Temporal Words to Show the Order of Events
A great book to use to show how authors use temporal words (first, next, then, etc) is My Rotten Red Headed Older Brother by Patricia Polacco.
- As you read this story aloud, you could either make a list of the time order words the author uses or you could display our Temporal Words Anchor Chart and ask students to raise their hands every time they hear one of the words on the list.
- After reading, ask the students some of the following questions: Why do you think an author might use words like these in a story? How do they help to tell the story? How could words like these help a reader to make sense of the story better? What purpose do they serve?
- Once students come to the conclusion that they help put things in order or show the order of how events happened, encourage them to use temporal words in their own stories so that their readers will understand their writing better.
- You could also model this skill with your own writing. Tell a story of a time when you were making something or an event in your life while using sequencing words.
Lesson 9: Authors Use Quotation Marks to Show Speech
We suggest the mentor text Fireflies! by Julie Brinckloe for this lesson. Quotation marks are something that not all children will be ready to try in their own writing. However, this is a good introduction to quotation marks for all students. Those who are ready can try it out as they write their personal narratives.
- Read the book during writing workshop or at a previous read aloud time and revisit for this lesson. (This will help keep your writing workshop lesson to a true mini-lesson time.)
- Reread a page where the author uses quotation marks in the book. Show students the marks and have children share why they think they are used. For classes where this is a new skill, explain the purpose. (You might also want to show or refer to comic books to help illustrate the point of “the actual words a character says”.)
- In front of the class, model using quotation marks in your own writing. It is a good idea to use chart paper instead of a smaller book for this lesson so that students can clearly see where the quotation marks and commas are placed. The chart paper can be left in the room as an anchor chart or you can use the Quotation Marks Anchor Chart we have created.
Lesson 10: Authors Write Strong Conclusions
For this lesson we suggest you use The Relatives Came by Cynthia Rylant as your mentor text. As it is a longer book, we like reading it for a read-aloud before the lesson.
- To start, write your own story in front of the students about going on a trip or having visitors.
- When you end your story use a very simple and not interesting ending. Then read aloud The Relatives Came (or simply reread the ending together) and discuss the ending.
- Refer back to your own story and reread the ending. Ask students to suggest ways you might make your ending more interesting for readers.
- Display the Ideas for Powerful Endings Anchor Chart and discuss the different ways you could end your story in a more exciting way.
- With your class, rewrite your ending to illustrate how much better the story can be.
Lesson 11: Authors Use Powerful Adjectives, Adverbs and Verbs
Stellaluna by Janell Cannon is a great book for this lesson.
- Before you begin, review adjectives, adverbs and verbs with your students.
- Display our three Powerful Words blank charts. For younger classes, you may want to stick with adjectives and verbs.
- Let the students know that they are to be listening for “powerful” words that describe characters, settings or events very well.
- Next, read aloud the book Stellaluna. As you read have students help you to pick out the adjectives, verbs, etc. that the author uses to help readers visualize the story. Add these words to the correct anchor chart. Discuss how the words make the story better for readers.
- Tell students that you would like for them to start looking for powerful words when they are reading books. If they come across a word that they believe is especially powerful then they can write it on a Post-It. Then, add it to the chart you started for the class.
- Tell them that they can refer to this chart when they are writing to get ideas for powerful words they might want to use.
- As a follow up lesson, you may want to introduce and model our graphic organizer Powerful Words I Will Use. This organizer gives the students an opportunity to brainstorm powerful words before they even begin a narrative story. They will draw a picture of their character or event and brainstorm adjectives, adverbs or verbs that they think would help their story to be more interesting. They can refer to this organizer when they are revising to make their story better.
Lesson 12: Authors Edit Their Work For Punctuation
The story Yo! Yes. by Chris Raschka is a good book to illustrate the importance of punctuation in writing.
- Before beginning, use pieces of Post-Its to cover up all the punctuation in this story.
- Read the story aloud to the class and act confused by its meaning because of the missing punctuation.
- After reading, ask the students if the story made much sense.
- Next, quickly flip through and take out the Post-Its.
- Reread the story with the punctuation to illustrate how it impacts the meaning.
- If you want, you can follow this up by writing a paragraph from one of your own books on chart paper, remembering to leave out some punctuation marks. As a class, practice editing the sample for correct punctuation.
Lesson 13: Authors Edit Their Work For Capitalization
This lesson is meant to serve as a reminder and review of words needing capitalization.
- To prepare, write out a paragraph from a story or one of your own books on chart paper. Leave out all capital letters.
- Display our Don’t Forget to Capitalize Anchor Chart and discuss when students should be using a capital letter.
- Then, as a class, practice editing the sample for correct capitalization.
- Pass out a Don’t Forget to Use Capital Letters Reminder Note to each student. These can be personal anchor charts.
Lesson 14: Authors Revise and Edit Their Work With Peers
This lesson helps students to realize that simply writing a piece one time on paper doesn’t mean that it is always finished. Sometimes revision and editing are needed to finish pieces of writing depending upon the purpose and audience.
- Remind students that even real authors typically let their family and friends read their stories before finalizing for feedback. Tell students that student authors are no different. They will always be revising and editing their stories with the teacher and with friends in the classroom.
- Getting ideas to make stories even better is a wonderful way to improve our writing. Friends can help us check spelling, capitalization and punctuation. Discuss the purpose for revision – to help the author make things more clear and to add new or interesting ideas to the writing. Then discuss the purpose for editing – to make corrections in spelling, capitalization and punctuation.
- You might want to refer to the revision and editing descriptions in our launching unit for more ideas. You could separate this into lessons if you wish. You can find the post here: Launching Writer’s Workshop. (Revision and editing are in Lessons 16 and 17.)
- Assign partners and have them read their books to a classmate at least two times. The first time will be to give ideas to clear up confusion or to add something interesting. The second time they read the story it will be to look at every word and sentence to make sure spelling, punctuation and capitalization are correct. We suggest modeling this with one student to show students your expectations.
Lesson 15: Publishing
In the younger grades, we don’t believe it is necessary for students to recopy everything into a new book to make a final draft. It can become cumbersome and tedious.
Instead, for young writers to publish, they should perhaps simply double check their work and add details to their drawings.
If you are a 3rd grade teacher and/or have students who are ready for more “advanced” publishing, consider modeling what this might look like. You could publish your own story in a variety of ways to show them what you want or expect in a “published” piece of writing. Maybe they will recopy the story in another blank book. Maybe they will type their stories and then add illustrations.
Lesson 16: Celebration
We love having some type of celebration at the end of a unit of study. Students are typically very excited about their writing. Sharing with classmates or even family is a fun way to celebrate.
Your celebration might be small and just for the class. You could serve cookies and drinks while students take turns reading their personal narratives. Or, you could make your celebration bigger and invite principals, parents and other classes.
There is a Congrats Author certificate you can use to share with your students.
Sharing Idea! We like to encourage some students to leave books in a special basket for sharing after the unit of study.
You will also find a book dedication plate for students to add to their published books.
**The resources for this unit can be found in one download here:
Personal Narrative Printables
If you are new to writing workshop, start here:
Planning a Dynamic Writing Workshop
Looking for mentor texts to add to your book basket? Try some of these (contains affiliate links)
Michelle
Tuesday 10th of August 2021
You guys are just awesome. Thank you for the resources. I am especially excited about the Getting To Know You and the Writer's Workshop.
Planning a Dynamic Writing Workshop - The Curriculum Corner 123
Monday 25th of June 2018
[…] Writing Personal Narratives […]
Editable Writing Management Binder - The Curriculum Corner 123
Friday 3rd of March 2017
[…] Personal Narrative Unit of Study […]
Aruna
Saturday 21st of November 2015
My son was struggling in writing stories and personal narratives. He got a strong vocabulary,good at spelling and plenty of ideas.The problem is he is unable to put his ideas in a sequence.When i was searching ,I came across ur website.Thank you very much, from today on wards I'm going to help my son with ur templates.Thank you.